How to Install Tuscan Path Natural Stone Pavers on a Concrete Base
TOOLS YOU'LL NEED:
Gather these tools before you begin your project:
Wheelbarrow
Sand and cement mix
Trowel with ½" notches
Angle grinder with a diamond blade
Landscaper's spray paint
Shovel
Rake
String line
Tape measure
Straight edge
Spirit level
Rubber mallet
Bucket and sponge
Safety glasses, earmuffs, and a mask
Pencil
Sawhorse
F-clamps
Grout float or gloves
Kneepads
Start by calculating how many natural stone pavers you will need. The amount depends on the size of the area you're paving and the size of each stone. For example, if you're working with a 40 m² area and standard 600 x 600 mm natural stone pavers, calculate accordingly, leaving room for any cutting.
Pro Tip: Add an extra 10% to your total paver count to account for breakages or cuts.
The first step is to ensure your concrete base is ready for installation:
- Clear the Area: Remove any debris, dirt, or old materials from the concrete slab. You want a clean, smooth surface to lay your pavers on.
- Inspect the Concrete: Check for cracks or imperfections in the existing concrete. If there are any, fill them in with concrete filler, and allow the base to cure fully before proceeding.
- Create a Solid Base: For maximum adhesion, make sure the concrete is level and stable. If there are any low spots, use a self-leveling compound to ensure the surface is smooth.
Once your concrete base is prepared, it's time to mix the mortar:
- Mix Mortar: In your wheelbarrow, mix sand and cement in a ratio of 4:1. The consistency should be thick enough to hold the pavers in place without oozing out too much when you lay them down.
- Apply Mortar: Using your trowel, spread a 30-50mm layer of mortar across the concrete base. Ensure the layer is roughly the size of the natural stone paver you are laying.
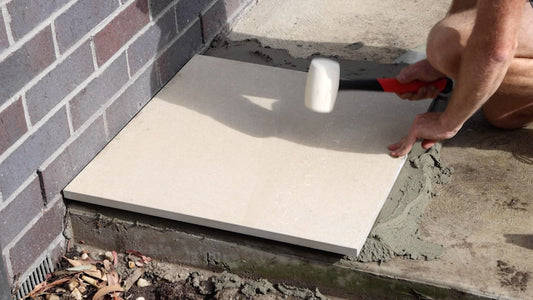
It's time to start laying the first stone:
- Apply Paver Adhesive: Natural stone pavers may need a bit of adhesive on the underside to help them stick to the mortar. Apply a layer of paver adhesive if necessary.
- Position the Paver: Place the first stone onto the mortar bed and press gently to secure it.
- Level the Paver: Use a rubber mallet to gently tap the paver into place. After tapping, check the paver's level using a spirit level. Adjust as needed to ensure the paver is perfectly level with the surrounding stones.
Tip: A string line running along the area can help ensure your pavers are laid in a straight line.
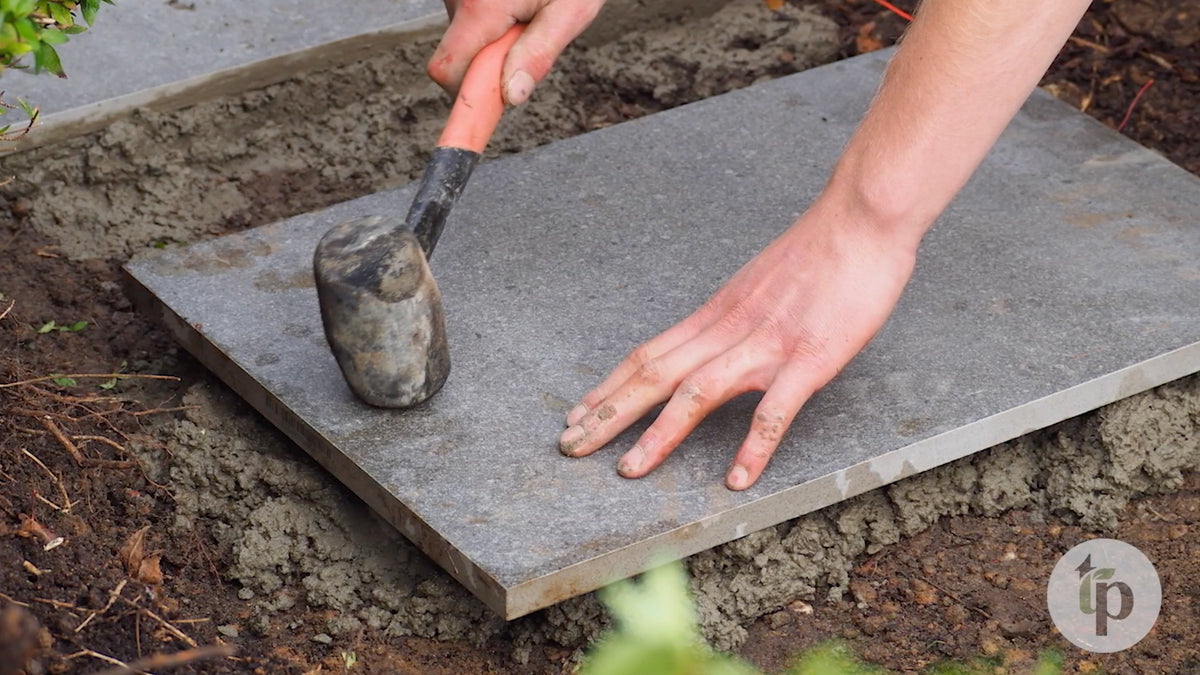
Now that the first stone is in place, continue with the others:
- Repeat the Process: For each subsequent paver, spread more mortar, apply adhesive to the bottom of the stone, and carefully position it with a 5mm gap between it and the previous one.
- Check Alignment: Regularly check the alignment and level of each paver, adjusting with the rubber mallet to ensure everything remains perfectly flush.
- Use Spacers: Consider using cross-type spacers to maintain an even gap between each stone for a consistent look.
As you progress to the second row:
- Offset the Joints: If you're using a specific pattern like a running bond, be sure to offset the joints between rows for a more cohesive appearance.
- Align with the String Line: Check alignment frequently with your string line. Make adjustments using the rubber mallet to ensure the pavers stay in a straight line.
When you reach the edges, you may need to cut some pavers to fit the available space:
- Measure the Gap: Measure the gap between the last stone and the edge of the area you're paving.
- Mark the Paver: Mark the measurement on the natural stone paver you'll be cutting.
- Cut the Paver: Secure the paver to a sawhorse using F-clamps, then use an angle grinder with a diamond blade to make a clean, precise cut.
Pro Tip: Always measure twice and cut once to avoid mistakes. Take your time for accurate results.
Now that all your pavers are laid, it's time to finish the job:
- Prepare the Grout: Mix grout according to the manufacturer's instructions.
- Apply Grout: Use a grout float to apply grout generously between the pavers, ensuring the gaps are fully filled.
- Clean Excess Grout: Use a damp sponge to remove any excess grout from the surface of the pavers. Be careful not to pull grout out from the joints.
Allow the pavers to set for 24 hours. During this period, avoid walking on them or placing any weight on them to ensure they bond correctly with the mortar.
Once the grout has fully set and your pavers are secure, step back and admire your stunning new outdoor space! Whether it's a patio, walkway, or driveway, your natural stone pavers will provide a sophisticated, durable surface that enhances the beauty of your home.