How to Install Click Floor Tiles: Easy DIY Guide

Click floor tiles are one of the easiest ways to instantly transform an outdoor or indoor space without the need for tools, adhesives, or permanent installation. Whether you're updating a balcony, courtyard, patio, or even a covered indoor area, these tiles are designed to simply click together for a fast, renter-friendly upgrade.
Below is a step-by-step guide to help you get a clean, professional-looking finish.
1. Prepare the Area
Before you begin, make sure your surface is properly prepared. The tiles need a clean, dry, level, and stable base so they can sit evenly and lock together correctly. Any dirt, loose debris, or uneven patches should be removed prior to installation.
These tiles are best suited to hard surfaces such as concrete, paving, timber decking, or composite decking. A well-prepared base will help ensure the finished result looks neat and stays secure over time.
2. Plan Your Layout
Once your surface is ready, take a moment to plan how your tiles will sit in the space. It’s recommended to loosely lay the tiles out first without connecting them so you can visualise the final result.
Starting from one corner of the space, work outward in a consistent direction. This helps maintain a structured layout and reduces the chance of awkward gaps at the edges. It’s also a good opportunity to check how the tiles meet walls, edges, or fixed objects before locking them into place.
3. Connect the Tiles
Each tile is designed with a simple interlocking system. Two sides feature connecting pins, while the other two sides have matching holes. To install, align the pins of one tile with the holes of the next tile, then press down firmly until you hear or feel them click into place.
Once connected, the tiles lock securely together without the need for tools or adhesives. Take your time with the first few tiles, as setting a straight and even start will make the rest of the installation much easier.

4. Continue Laying the Tiles
After the first tiles are connected, continue building your surface row by row. As you work, check alignment regularly to ensure the tiles remain straight and properly locked together.
Because the system is modular, you can easily adjust positioning as you go. If something feels slightly off, it can be corrected before moving too far ahead, helping you achieve a clean and consistent finish across the entire area.
5. Finishing the Edges
When you reach walls or fixed edges, you may need to leave a small gap to allow for natural movement. This also helps create a cleaner, more professional-looking finish.
If desired, edge trims can be used to neaten the perimeter and give the installation a more complete appearance. This step is optional but can enhance the overall look of the space.
At this point, you can finish your project or some people like to sweep in sand to fill all the gaps.
Care & Maintenance
Click floor tiles are designed to be low maintenance and suitable for both indoor and outdoor use. Regular sweeping will help keep the surface clean, and they can be hosed down when needed to remove dirt or debris.
It’s best not to leave the tiles submerged in water for extended periods. In some cases, you may choose to lift them occasionally to clean underneath and ensure good airflow.
Coverage Guide
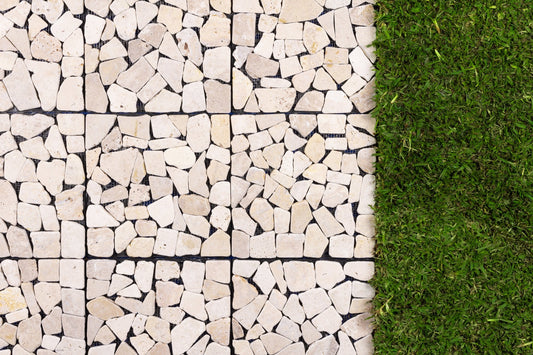
Each tile measures approximately 29.5cm x 29.5cm. A 4-pack covers roughly 0.35m², so it’s important to measure your space before purchasing to ensure you have enough coverage for your project.
Our Tuscan Path Tip
These tiles are designed specifically for easy DIY installation. No tools, glue, or specialist skills are required—simply click them together and your space is instantly transformed.